
Introduction
Artisan bread has steadily gained popularity among home bakers and food enthusiasts alike, celebrated for its rustic charm and complex flavors. The allure of a freshly baked loaf—complete with a crunchy crust and a soft, airy interior—has made artisan bread a staple in many kitchens. Traditionally, artisan bread is crafted by skilled bakers who focus on quality ingredients, time-tested techniques, and a deep understanding of fermentation processes. However, the modern baker can achieve similar results with the help of technology. Enter the bread machine, a kitchen appliance that simplifies the bread-making process while still allowing for the creation of delicious, homemade artisan loaves.
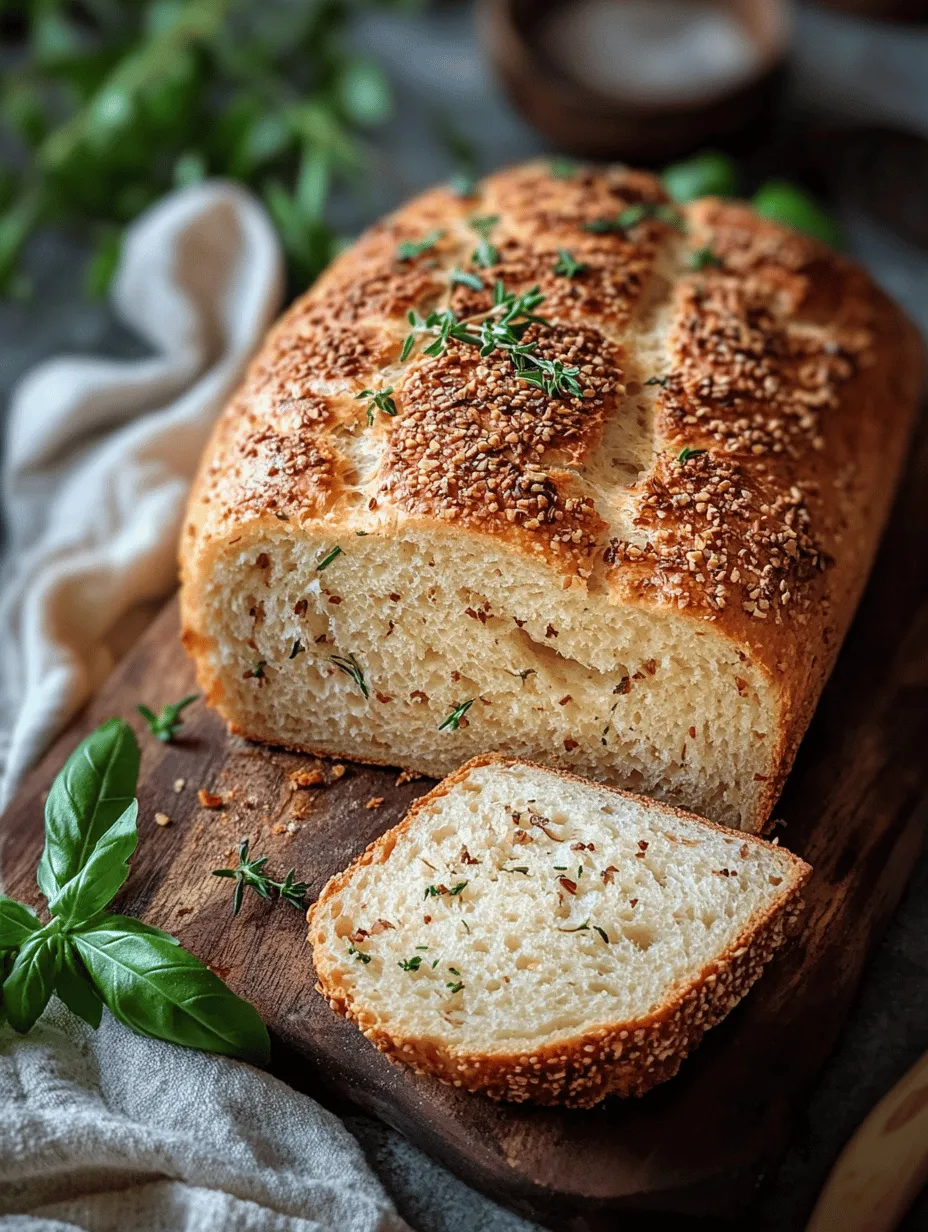
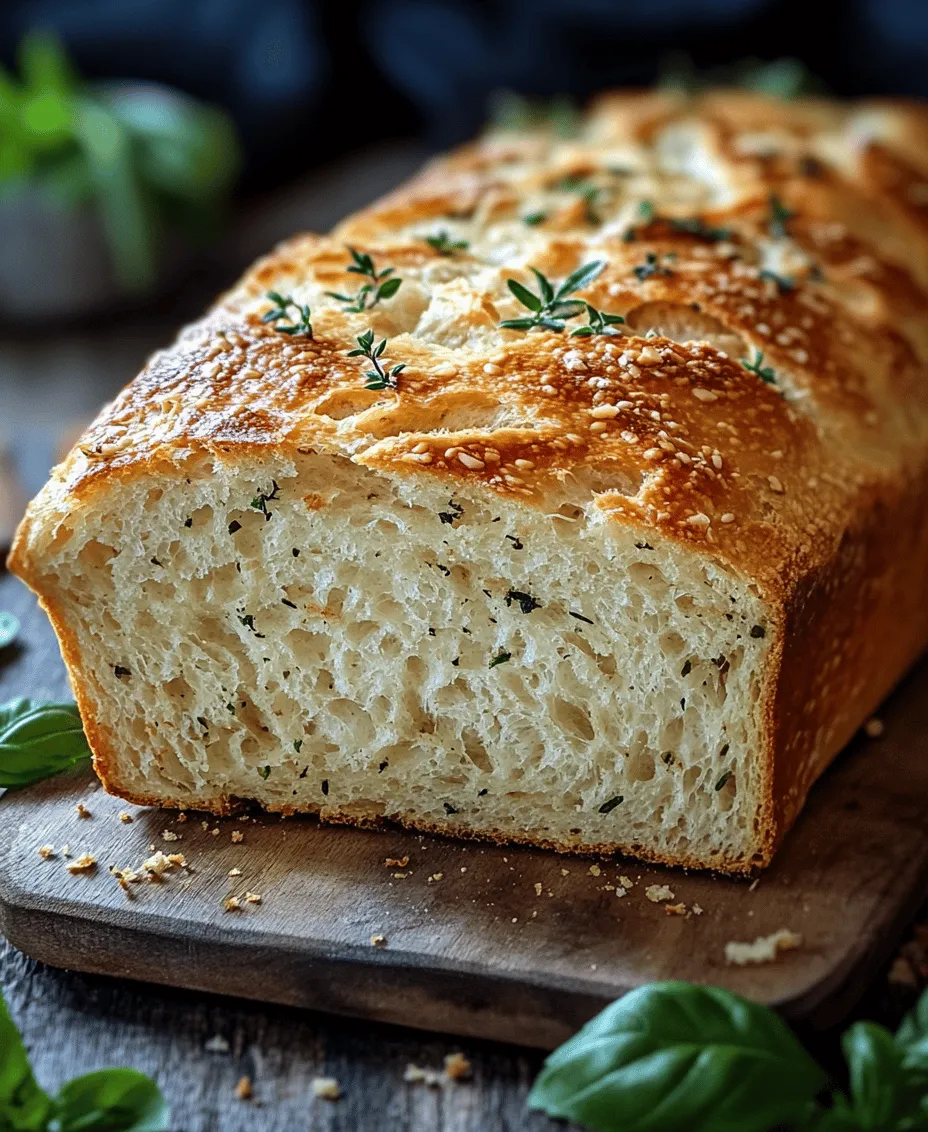
This article introduces you to the delightfully aromatic Rustic Herb & Garlic Artisan Bread Machine Loaf. Infused with the rich flavors of garlic and a blend of herbs, this recipe brings out the best in artisan baking without the need for extensive kneading or monitoring. Using a bread machine not only streamlines the process but also ensures consistent results every time. With just a few simple steps, you can enjoy the comforting smell of freshly baked bread wafting through your home.
One of the standout features of this Rustic Herb & Garlic Artisan Bread recipe is its emphasis on fresh ingredients. The quality of the herbs and garlic used plays a crucial role in enhancing the bread’s flavor profile. Fresh herbs bring vibrant tastes and aromas, while garlic adds a savory depth that transforms a simple loaf into a gourmet experience.
Understanding Artisan Bread
Artisan bread is defined by its handcrafted quality, focus on natural ingredients, and traditional techniques. Unlike commercially produced bread, which often contains preservatives and additives to prolong shelf life, artisan bread is made with minimal ingredients and typically allows for longer fermentation times. This extended fermentation process not only develops the bread’s flavor but also contributes to its unique texture.
One of the distinguishing characteristics of artisan bread is its crust. A well-made artisan loaf boasts a crispy, golden-brown exterior that encases a chewy, open crumb structure. This texture is achieved through the combination of high-gluten flour, proper hydration, and a careful fermentation process. The flavors of artisan bread are often enhanced by the inclusion of various ingredients, such as herbs, cheeses, or spices, which add a delightful complexity.
Using a bread machine to make artisan bread simplifies this intricate process. While traditional methods require monitoring dough rise times and baking temperatures, a bread machine automates much of the work. With pre-programmed settings, you can easily select the desired crust color, loaf size, and baking time, allowing you to focus on the joy of creating delicious bread without the typical stress of manual baking.
Ingredients Breakdown
Before diving into the step-by-step instructions for making the Rustic Herb & Garlic Artisan Bread, let’s take a closer look at the key ingredients that will contribute to its delightful flavor and texture. Understanding the role of each component will help you appreciate the nuances of this recipe and enable you to make any necessary substitutions or adjustments based on your preferences.
Bread Flour
The foundation of any good artisan bread is high-quality bread flour, which has a higher protein content compared to all-purpose flour. This increased protein level is essential for gluten development, which provides the structure and elasticity needed for a well-risen loaf. Using bread flour ensures that your Rustic Herb & Garlic Artisan Bread will have the perfect balance of chewiness and tenderness, resulting in a satisfying bite.
Salt
Salt is not just a seasoning; it plays a crucial role in the bread-making process. It enhances the flavor of the bread and helps to regulate yeast activity. Salt strengthens the gluten structure, contributing to the overall texture of the bread. It also aids in the fermentation process by slowing down yeast activity, allowing for more controlled rising times. In this recipe, the right amount of salt is essential for achieving a well-balanced flavor.
Sugar
Sugar serves multiple functions in bread making. First and foremost, it provides food for the yeast, promoting fermentation and contributing to the rise of the loaf. Additionally, sugar aids in the browning of the crust, resulting in that desirable golden-brown color. While this recipe calls for only a small amount of sugar, it is vital for achieving a beautifully baked bread.
Instant Yeast
Using instant yeast in this recipe simplifies the process even further. Unlike active dry yeast, instant yeast does not require proofing in water before use, which saves time and effort. Instant yeast can be added directly to the dry ingredients, making it ideal for bread machine recipes. It works quickly and effectively, ensuring a reliable rise for your Artisan Bread.
Dried Oregano and Thyme
These dried herbs are the stars of this recipe, imparting aromatic flavors to the bread. Oregano has a slightly peppery taste with hints of sweetness, while thyme adds a subtle earthiness. Both herbs complement the garlic beautifully, creating a harmonious blend of flavors. Additionally, dried herbs are convenient to use and have a long shelf life, making them a staple in any kitchen.
Garlic
Garlic is a key ingredient that elevates this bread to new heights. Its pungent flavor transforms during the baking process, mellowing into a warm, savory note that permeates the loaf. Beyond its delicious taste, garlic is known for its numerous health benefits, including anti-inflammatory properties and potential immune-boosting effects. For this recipe, you can use minced fresh garlic for a robust flavor or opt for garlic powder for a milder taste.
Olive Oil
A drizzle of extra virgin olive oil enhances both the moisture and flavor of the bread. The oil contributes to a tender crumb and adds richness to the overall taste. Additionally, olive oil has health benefits, including heart-healthy fats and antioxidants. Using high-quality olive oil can make a noticeable difference in the final product, so choose one that you enjoy.
Optional Fresh Herbs
To take this Rustic Herb & Garlic Artisan Bread to the next level, consider adding fresh herbs like parsley, rosemary, or basil. Fresh herbs not only enhance the visual appeal of the loaf but also add a burst of flavor that complements the dried herbs and garlic. If you opt for fresh herbs, adjust the quantities accordingly, as their flavors can be more potent than their dried counterparts.
Step-by-Step Instructions for Bread Machine Preparation
Now that you have a solid understanding of the ingredients that contribute to the Rustic Herb & Garlic Artisan Bread, it’s time to dive into the step-by-step instructions for preparing this delightful loaf in your bread machine. Follow these guidelines to ensure a smooth baking experience and a delicious final product.
Preparing the Bread Machine
Before you begin, it’s essential to prepare your bread machine properly. Make sure the baking pan is clean and free of any residue from previous uses. Check that the kneading blade is securely attached to the bottom of the pan. Familiarize yourself with your machine’s settings, particularly those related to crust color and loaf size, as these will affect your final product.
Step 1: Gather Your Ingredients
Ensure you have all the necessary ingredients measured out and ready. This preparation will streamline the process and prevent any last-minute scrambling. For this recipe, you will need:
– 3 cups of bread flour
– 1 teaspoon of salt
– 1 tablespoon of sugar
– 2 teaspoons of instant yeast
– 1 teaspoon of dried oregano
– 1 teaspoon of dried thyme
– 3 cloves of minced garlic (or 1 teaspoon of garlic powder)
– 1 tablespoon of extra virgin olive oil
– 1 cup of warm water (around 110°F)
Step 2: Add the Ingredients to the Bread Machine
When using a bread machine, the order of ingredient addition is crucial for optimal mixing and rising. Start by adding the warm water to the bread pan. The water should be comfortably warm to promote yeast activity without killing it. Next, add the olive oil to the water.
After adding the liquids, it’s time to incorporate the dry ingredients. Carefully measure and add the bread flour, ensuring it completely covers the liquid ingredients. This layering prevents the yeast from coming into direct contact with the liquid too early, allowing for better rise and texture.
Step 3: Add the Dry Ingredients
Once the bread flour is in, create small wells in the flour for the salt, sugar, and yeast. Be careful not to let these ingredients touch the liquid until you start the machine. Add the salt to one well, the sugar to another, and finally, the instant yeast to a third well. This method helps to keep the yeast inactive until the mixing process begins.
Next, sprinkle the dried oregano, thyme, and minced garlic (or garlic powder) evenly over the flour. These flavors will infuse the dough as it kneads, creating a wonderfully aromatic bread.
Step 4: Set Your Bread Machine
After all the ingredients are in place, securely attach the bread pan to the machine. Close the lid and select the appropriate settings for your Rustic Herb & Garlic Artisan Bread. Typically, you’ll want to choose a basic or artisan bread setting with a medium crust option. If your machine has a timer, you can set it to start at a later time, allowing you to wake up or come home to the smell of freshly baked bread.
Step 5: Start the Machine and Monitor the Dough
Once you’ve selected the settings, press start. As the machine begins to knead, take a moment to observe the dough. After a few minutes of mixing, lift the lid and check the consistency. The dough should be smooth and elastic but not overly sticky. If it appears too dry, add a teaspoon of warm water; if it’s too wet, sprinkle in a little more flour. This step can help you achieve the perfect dough texture, which is crucial for a successful loaf.
Step 6: Let the Machine Do the Work
After the initial mixing and adjustments, you can sit back and relax while the bread machine does its magic. The kneading, rising, and baking processes will unfold automatically. Depending on your machine’s settings, this may take several hours, but the result will be well worth the wait.
As your Rustic Herb & Garlic Artisan Bread bakes, anticipate the delightful aroma filling your kitchen, signaling that a warm, flavorful loaf is on its way.
—
This article has provided a comprehensive introduction to making Rustic Herb & Garlic Artisan Bread using a bread machine. By understanding the ingredients and following the step-by-step instructions, you are well on your way to creating a delicious homemade loaf that rivals those found in artisanal bakeries. Stay tuned for the next part, which will delve into baking tips and common questions that arise during the bread-making process.
Mixing Dry Ingredients: Importance of Thorough Blending
When embarking on your journey to create a Rustic Herb & Garlic Artisan Bread, one crucial step is the mixing of dry ingredients. A thorough blending of flour, salt, yeast, and your chosen herbs is essential for achieving a uniform flavor and texture throughout the loaf. A well-mixed dry blend ensures that the yeast is evenly distributed, allowing for consistent fermentation and rising. This step also prevents any clumping of the yeast or salt, which could inhibit the bread’s rise or alter its flavor. To achieve this, use a whisk or fork to combine your dry ingredients in a large bowl before transferring them to the bread pan. This small but significant action sets the foundation for a beautifully risen and flavorful loaf.
Layering the Ingredients Properly in the Bread Pan
Proper layering of ingredients in the bread pan is another critical aspect of bread machine baking. The order in which you add your ingredients can significantly affect the outcome of your bread. Start by adding the liquid ingredients, such as water and any oils, followed by the dry ingredients. Make sure to create a small well in the center of the dry ingredients to place the yeast. This method keeps the yeast separate from the salt and liquid until the kneading process begins, ensuring maximum activation. Following this layering technique will help your bread machine work its magic, resulting in a beautifully risen and perfectly textured loaf.
Selecting the Right Settings on the Bread Machine
Once your ingredients are layered correctly, it’s time to select the right settings on your bread machine. For the Rustic Herb & Garlic Artisan Bread, you’ll want to choose the setting that corresponds to a basic white or artisan bread cycle. Most machines have specific settings for different types of bread, so consult your bread machine’s manual for guidance. Additionally, if you prefer a darker crust, some machines offer crust color settings that allow you to customize the browning level. Ensuring that you’ve selected the correct size option (usually 1.5 to 2 pounds for this recipe) is also vital for achieving the perfect loaf.
Importance of Monitoring the Dough Consistency During the Kneading Process
While your bread machine kneads the dough, it’s essential to monitor the consistency. After the initial mixing, take a moment to check the dough through the viewing window. Ideally, the dough should form a soft, elastic ball that pulls away from the sides of the pan. If the dough appears too dry and crumbly, you may need to add a tablespoon of water. Conversely, if it looks too wet and sticky, sprinkle in a bit more flour. This hands-on approach ensures that you achieve the right balance of moisture and flour, which is crucial for the bread’s final texture and structure.
What to Expect During the Baking Cycle: Aroma and Texture
As the baking cycle commences, your kitchen will be filled with the irresistible aroma of freshly baked bread, a sure sign that your Rustic Herb & Garlic Artisan Bread is on its way to perfection. The Maillard reaction—a chemical process that occurs during baking—will contribute to the rich, golden-brown crust. Expect a crust that is both crispy and inviting, encasing a soft, airy interior. The herbs and garlic will infuse the bread with a delectable flavor, making it a staple in your home. When the baking cycle is complete, allow the bread to cool in the pan for a few minutes before transferring it to a wire rack. This step is crucial for preventing a soggy bottom.
The Science Behind Bread Baking
Understanding the science behind bread baking can enhance your appreciation for the process and its outcomes.
Explanation of the Fermentation Process and Its Significance in Bread Making
Fermentation is a vital step in bread making, where yeast consumes sugars and produces carbon dioxide and alcohol. This process causes the dough to rise, leading to the light and airy texture characteristic of good bread. During the fermentation stage, the dough also develops flavor, as the yeast breaks down complex carbohydrates into simpler sugars and organic acids. The longer the fermentation, the more complex the flavor profile will be, which is why many artisan breads benefit from a longer rise time.
The Maillard Reaction: How It Contributes to the Crust Color and Flavor
The Maillard reaction is responsible for the beautiful crust that forms on your Rustic Herb & Garlic Artisan Bread. This complex chemical reaction occurs between amino acids and reducing sugars during baking, creating a brown color and rich flavors. The result is a crust that is not only visually appealing but also adds depth to the overall taste of the bread. This reaction is enhanced by the use of natural ingredients, such as herbs and garlic, which contribute additional flavors that can make your bread truly unique.
Understanding the Importance of Temperature in Yeast Activation
Temperature plays a crucial role in yeast activation. Yeast thrives in warm conditions, typically between 75°F and 85°F (24°C to 29°C). If the water you use to activate the yeast is too hot, it can kill the yeast, leading to a dense and poorly risen loaf. Conversely, if the water is too cold, the yeast may not activate properly, resulting in sluggish fermentation. To achieve optimal results, use water that is warm to the touch but not hot, ensuring that your yeast is activated and ready to work its magic.
The Role of Gluten Development in Achieving the Perfect Crust and Chewiness
Gluten, a protein found in wheat, is essential for giving bread its structure and chewiness. As the dough is kneaded, gluten strands develop and create a network that traps gases produced by the yeast during fermentation. This network is what allows your bread to rise and hold its shape. For artisan bread, a strong gluten structure is vital for achieving that characteristic chewy crust and airy crumb. By following the mixing and kneading instructions carefully, you can ensure that your gluten develops properly, resulting in a loaf that is both delicious and visually appealing.
Serving Suggestions and Pairing Ideas
Once your Rustic Herb & Garlic Artisan Bread has cooled, it’s time to think about serving suggestions and pairing ideas that will elevate your culinary experience.
Recommended Serving Suggestions for Rustic Herb & Garlic Artisan Bread
This artisan bread is versatile and can be served in various ways. Enjoy it sliced with a pat of softened butter or olive oil for a simple yet satisfying treat. For a more gourmet experience, create bruschetta by toasting slices of the bread and topping them with diced tomatoes, basil, and a drizzle of balsamic glaze. This bread also shines when served alongside a cheese platter, where its herbal notes complement a variety of cheeses.
Ideal Pairings with Spreads, Soups, or Salads
Rustic Herb & Garlic Artisan Bread pairs beautifully with a range of spreads, soups, and salads. Try it with garlic herb cheese spread for a delightful appetizer. It’s also perfect for dipping into hearty soups such as minestrone or creamy tomato basil. For a light lunch, serve the bread alongside a fresh green salad tossed with a lemon vinaigrette to balance the rich flavors of the bread.
Creative Uses for Leftover Bread: Croutons, Breadcrumbs, or French Toast
Don’t let any leftover bread go to waste! Transform your artisan bread into croutons by cubing it, tossing with olive oil and herbs, and baking until golden. These homemade croutons are a fantastic addition to salads and soups. Alternatively, you can make breadcrumbs by processing the stale bread in a food processor, which can be used for breading chicken or fish, or as a topping for pasta dishes. If you’re in the mood for breakfast, turn leftover slices into French toast by dipping them in a mixture of eggs, milk, and cinnamon, then cooking them on a skillet until golden brown.
Storing Your Artisan Bread
Proper storage is essential to maintain the freshness of your homemade artisan bread.
Best Practices for Storing Homemade Artisan Bread to Maintain Freshness
To keep your Rustic Herb & Garlic Artisan Bread fresh, store it at room temperature in a paper bag or wrapped in a clean kitchen towel. Avoid plastic bags, as they can trap moisture and lead to a soggy loaf. If you anticipate not consuming the bread within a few days, consider freezing it to preserve its quality.
When and How to Freeze Artisan Bread
For freezing, slice the bread (if desired) and wrap it tightly in plastic wrap before placing it in a freezer-safe bag. This method keeps air out and prevents freezer burn. Frozen artisan bread can be stored for up to three months. When you’re ready to enjoy it again, simply remove the slices or loaf from the freezer and let it thaw at room temperature. For the best texture, consider warming it in the oven for a few minutes before serving.
Tips for Reheating Bread Without Losing Its Texture and Flavor
To reheat your artisan bread without sacrificing its texture, preheat your oven to 350°F (175°C) and place the bread directly on the rack for about 10 minutes. This method helps restore the crust’s crispness while keeping the interior soft and chewy. Alternatively, you can wrap the bread in aluminum foil to retain moisture if you prefer a softer crust.
Nutritional Benefits of Homemade Bread
Homemade artisan bread offers numerous nutritional benefits over store-bought alternatives.
Comparison of Homemade Bread Versus Store-Bought Bread Regarding Nutrition
One significant advantage of homemade bread is that you have complete control over the ingredients. Store-bought bread often contains preservatives, artificial flavors, and high levels of sodium. In contrast, your Rustic Herb & Garlic Artisan Bread uses whole, natural ingredients, making it a healthier choice. With the ability to choose high-quality flour and fresh herbs, your homemade bread is not only fresher but also free from unwanted additives.
Insights into the Health Benefits of Using Whole, Natural Ingredients
Using whole ingredients in your bread, such as whole wheat flour and fresh herbs, enhances the nutritional profile. Whole grains are rich in fiber, which supports digestive health and helps to keep you feeling full. The herbs and garlic not only add flavor but also provide antioxidants and potential health benefits, such as anti-inflammatory properties.
Addressing Common Dietary Concerns: Gluten, Sodium, and Preservatives
For those with dietary concerns, making your bread allows you to tailor it to your needs. If you are gluten-sensitive, consider using gluten-free flour alternatives. By making your bread, you can regulate the amount of salt you include, addressing concerns about sodium intake. Lastly, homemade bread is free from preservatives, making it a cleaner option for those looking to minimize processed foods in their diet.
Conclusion
Baking your Rustic Herb & Garlic Artisan Bread is a delightful and rewarding experience that fills your home with warmth and aroma. The process of using a bread machine simplifies the art of bread making while allowing you to enjoy the satisfaction of creating something from scratch. With each slice, you not only savor the unique flavors of herbs and garlic but also feel the joy of using wholesome, natural ingredients.
As you continue your baking journey, consider experimenting with variations—perhaps adding different herbs, cheeses, or even spices to customize your loaf to your taste. The possibilities are endless, and each loaf will bring its own unique flavor and aroma to your table. So, roll up your sleeves, gather your ingredients, and enjoy the art of homemade bread baking. Your Rustic Herb & Garlic Artisan Bread awaits!