

Introduction
During the holiday season, the aroma of freshly baked cookies wafts through homes, creating an atmosphere of warmth and festivity. Chocolate cookies, in particular, hold a special place in the hearts of many, celebrated for their rich flavors and comforting textures. Among these delightful treats, chocolate snowball cookies stand out, offering a unique combination of indulgent chocolate flavor draped in a snowy, sweet powdered sugar finish.
This recipe for Easy Chocolate Snowball Cookies is designed for every home baker, whether you’re a seasoned pro or just starting out in the kitchen. The beauty of this cookie lies in its simplicity; it requires minimal ingredients and effort, making it an ideal choice for busy bakers looking to create something special without the fuss. This recipe not only meets the need for easy baking but also ensures that you achieve impressive results that will delight both family and friends.
The Allure of Chocolate Snowball Cookies
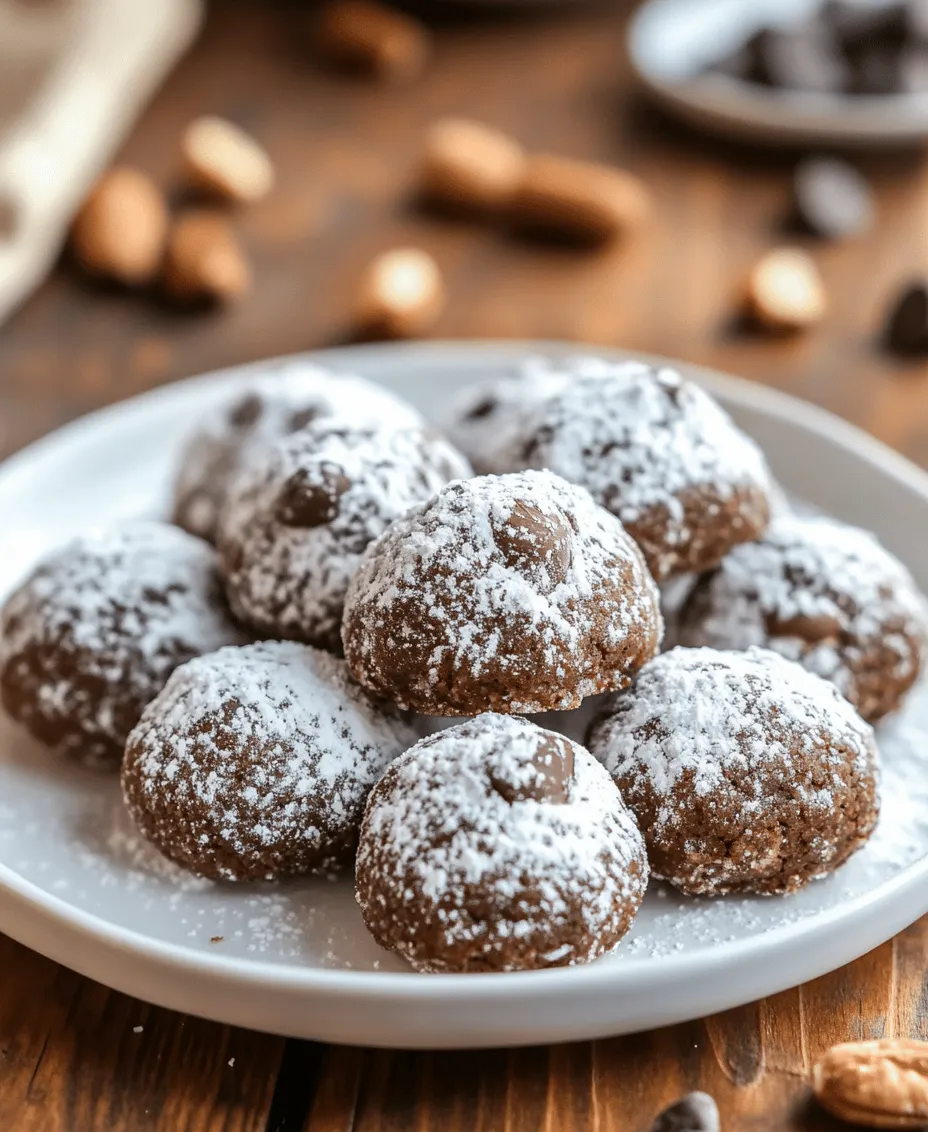
Chocolate snowball cookies are a delightful treat that boasts a unique texture and taste profile. These cookies are soft and melt-in-your-mouth tender, with a rich chocolate flavor that satisfies even the most discerning chocolate lover. The signature snowy finish, created by rolling the cookies in powdered sugar, adds a delightful contrast to the deep, dark chocolate color of the cookie itself, making them visually appealing as well.
When compared to other popular chocolate cookies, such as classic chocolate chip cookies, chocolate snowball cookies offer a different experience. While chocolate chip cookies are chewy and packed with gooey chocolate chunks, snowball cookies are more delicate and crumbly, reminiscent of shortbread but with the added richness of cocoa. This makes them perfect for those who enjoy a lighter cookie with a sophisticated flair.
Culturally, snowball cookies have variations around the world. Known as “Russian tea cakes” or “Mexican wedding cookies,” these treats are often made with nuts and rolled in powdered sugar, regardless of the specific recipe. The concept of encasing a rich filling in a crumbly exterior is embraced globally, making chocolate snowball cookies a beloved treat that transcends borders.
Ingredients Breakdown
To create these delicious Easy Chocolate Snowball Cookies, you’ll need the following ingredients, each playing a crucial role in the final outcome:
– Unsalted Butter: The foundation of any great cookie begins with butter. In this recipe, using softened unsalted butter is essential for achieving the perfect texture. It allows for easy creaming with sugar, which incorporates air into the dough, resulting in a light and airy cookie. Unsalted butter also gives you control over the salt level in your cookies.
– Powdered Sugar: This ingredient serves multiple purposes. First, it is used in the cookie dough to add sweetness. Second, and most importantly, powdered sugar is what gives chocolate snowball cookies their signature snowy finish. After baking, the cookies are rolled in powdered sugar, creating a beautiful, soft coating that enhances the overall sweetness and visual appeal of the cookies.
– Vanilla Extract: A splash of vanilla extract is a must-have in baking. It enhances the flavors of the other ingredients, rounding out the taste profile of the cookies. In chocolate recipes, vanilla serves to deepen the chocolate flavor, making the cookies taste even richer and more complex.
– All-Purpose Flour & Cocoa Powder: These two ingredients form the base of the cookie dough. All-purpose flour provides structure, ensuring that the cookies hold their shape while baking. Cocoa powder, on the other hand, is what imparts the rich chocolate flavor in every bite. Together, they create a balanced dough that is both tender and flavorful.
– Salt: While it may seem counterintuitive, a pinch of salt is vital in sweet recipes. It acts to balance the sweetness of the cookies, enhancing the overall flavor without making the cookies taste salty. Salt also brings out the depth of flavor in chocolate, making it even more enjoyable.
– Chopped Nuts: Adding chopped nuts, such as walnuts or pecans, introduces a delightful crunch and additional flavor to the cookies. Nuts provide texture that contrasts beautifully with the soft cookie, elevating the overall experience. If you prefer a nut-free version, feel free to omit this ingredient.
– Chocolate Chips (Optional): For those who want to amp up the chocolate flavor, adding chocolate chips is a fantastic option. These can be folded into the dough before baking, giving your cookies pockets of gooey chocolate that melt into the cookie as they bake. Whether you choose to include them or not, the chocolate chips can customize your cookies to fit your taste preferences.
With this ingredient breakdown, it’s easy to see how each component contributes to the delicious outcome of chocolate snowball cookies. Now that we’ve covered the essential ingredients, let’s move on to the initial steps involved in bringing these delightful cookies to life.
Initial Steps Involved
1. Preparation: Before diving into the mixing process, it’s crucial to prepare your workspace. Start by preheating your oven to 350°F (175°C). This ensures that your cookies will bake evenly and achieve that perfect texture. Line a baking sheet with parchment paper or a silicone baking mat for easy cleanup and to prevent sticking.
2. Creaming the Butter and Sugar: In a large mixing bowl, combine the softened unsalted butter with powdered sugar. Using a hand mixer or a stand mixer fitted with the paddle attachment, cream the butter and sugar together on medium speed until the mixture becomes light and fluffy. This process usually takes about 3-5 minutes. Properly creamed butter and sugar are essential for achieving fluffy cookies, as this incorporates air into the dough.
3. Adding Flavorings: Once the butter and sugar are adequately creamed, it’s time to enhance the flavor. Add in the vanilla extract and mix until fully integrated. The sweet, warm notes of vanilla will elevate the chocolate flavor, making your cookies even more irresistible.
4. Combining Dry Ingredients: In a separate bowl, whisk together the all-purpose flour, cocoa powder, and salt. This step helps to evenly distribute the cocoa and salt throughout the flour, ensuring that every bite of your cookies is consistent in flavor. Gradually add the dry mixture to the creamed butter and sugar, mixing at a low speed until just combined. Be careful not to overmix, as this can lead to tough cookies.
5. Incorporating Nuts and Chocolate Chips: If you’re using chopped nuts or chocolate chips, fold them into the dough gently with a spatula. This ensures that they are evenly distributed without overworking the dough.
Now that you’ve completed these initial steps, your dough is ready for the next stage of creating these delightful chocolate snowball cookies. Stay tuned for the upcoming sections, where we’ll dive into the molding, baking, and finishing touches that will make your cookies truly shine.
Step-by-Step Instructions for Perfect Cookies
Preheat the Oven
The first step in making perfect chocolate snowball cookies is preheating your oven to 350°F (175°C). This is crucial because an oven that is not properly preheated can lead to uneven baking, resulting in cookies that are either undercooked or burnt. By ensuring that your oven reaches the right temperature before placing your cookies inside, you guarantee a consistent bake and a delightful texture.
Creaming Technique
Next, we move on to the creaming process, which is one of the most critical steps in cookie baking. Start by placing soft, room-temperature butter in a mixing bowl. Use an electric mixer on medium speed to beat the butter until it becomes light and fluffy. This usually takes about 2 to 3 minutes. Gradually add granulated sugar to the butter while continuing to mix. The goal here is to incorporate air into the mixture, which will help create a light and tender cookie. Remember, the texture of your cookie dough is heavily influenced by this step, so take your time to get it right.
Mixing Dry Ingredients
In a separate bowl, combine your dry ingredients: all-purpose flour, cocoa powder, baking powder, and a pinch of salt. Mixing them together before adding to the wet ingredients is essential for even distribution and to prevent lumps. If you skip this step, you risk having pockets of dry flour or cocoa in your cookies, which can lead to an inconsistent taste and texture. Use a whisk to thoroughly combine these dry ingredients, ensuring a smooth blend.
Folding in Nuts and Chocolate Chips
Once your wet and dry ingredients are prepared, it’s time to bring them together. Gently fold in the nuts and chocolate chips into the creamed butter and sugar mixture. Use a spatula to carefully incorporate the dry mixture into the wet ingredients, being cautious not to overmix. Overmixing can result in tough cookies, so aim for just combined. This gentle approach is crucial for maintaining the integrity of the chocolate chips and nuts while ensuring an even distribution throughout the dough.
Shaping the Cookies
Now it’s time to shape the cookies. Using a small cookie scoop or your hands, portion out the dough into small balls, approximately one inch in diameter. This size is perfect for achieving that classic snowball look. Place the cookie balls on a baking sheet lined with parchment paper, leaving about 2 inches of space between each ball. This spacing is important as the cookies will spread while baking, and you want them to have enough room to expand without merging into one another.
Baking Tips
Place your baking sheet in the preheated oven and bake the cookies for about 10 to 12 minutes. Keep an eye on them towards the end of the baking time. The cookies are done when they look slightly set on the edges but still have a soft center. A good sign of doneness is when the edges are just starting to turn golden brown. Remember, cookies will continue to bake slightly after being removed from the oven due to residual heat, so it’s better to slightly underbake them than overbake.
Cooling Process
Once baked, remove the cookies from the oven and allow them to cool on the baking sheet for about 5 minutes. This cooling time is essential as it allows the cookies to firm up a bit before transferring them to a wire rack. After a few minutes, carefully move the cookies to the wire rack to cool completely. This step is critical because cooling helps prevent the cookies from becoming soggy. Only after they are fully cooled should you dust them with powdered sugar for that classic snowball effect.
Serving Suggestions
Ideal Pairings
Chocolate snowball cookies are delightful on their own, but pairing them with beverages can elevate the experience. For a cozy afternoon treat, serve them with a cup of freshly brewed coffee or a rich hot chocolate. Alternatively, a warm cup of tea, such as Earl Grey or chai, complements the chocolate flavor beautifully. If you’re looking for something refreshing, consider pairing these cookies with a glass of cold milk or a sweet dessert wine.
Presentation Ideas
When it comes to serving, presentation is key. For gatherings or holiday parties, consider arranging the cookies on a festive platter lined with parchment paper. To add a touch of elegance, sprinkle additional powdered sugar on top just before serving. You can also place them in clear cellophane bags tied with a ribbon for a charming gift idea. For a more whimsical touch, consider using decorative tins. Not only do they keep the cookies fresh, but they also make for a beautiful centerpiece.
Suggestions for Storage
To keep your chocolate snowball cookies fresh and maintain their delightful texture, store them in an airtight container at room temperature. If stored properly, they can last for up to a week. For longer storage, you can freeze the cookies. Place them in a single layer on a baking sheet to freeze them individually before transferring to a freezer-safe container or bag. This method prevents them from sticking together. When you’re ready to enjoy them, simply thaw at room temperature for a few hours.
Nutritional Information
While chocolate snowball cookies are undeniably delicious, it’s good to be aware of their nutritional content. Each cookie contains approximately 100 calories, with varying amounts of fats and sugars depending on the specific ingredients used. For those looking to make modifications for a healthier version, consider substituting some of the all-purpose flour with whole wheat flour or using a sugar substitute. You can also reduce the amount of chocolate chips or nuts to lower the caloric content while still enjoying that signature snowball taste.
Conclusion
Chocolate snowball cookies bring a touch of joy and sweetness to any occasion, whether it’s a holiday gathering, a cozy winter evening, or just a delightful treat for yourself. The process of baking these cookies not only fills your kitchen with irresistible aromas but also creates lasting memories with friends and family. We encourage you to try this recipe and experience the delightful combination of flavors and textures.
Baking is not just about the end product; it’s about the love and care you put into each step. Homemade treats like chocolate snowball cookies have a special way of warming hearts and bringing people together. So, gather your ingredients, preheat that oven, and enjoy the simple pleasure of baking these delightful cookies. Whether shared with loved ones or savored alone, the experience of crafting these sweet bites is one you won’t forget. Happy baking!