

Introduction
Welcome to the delightful world of baking, where love and creativity come together to create irresistible treats! Today, we’ll explore a charming recipe for Heart-Shaped Thumbprint Cookies that are perfect for any occasion, especially for celebrating love and affection. These cookies are not just a sweet snack; they are a heartfelt gesture, making them ideal for Valentine’s Day, anniversaries, or simply to brighten someone’s day. With their buttery richness and sweet fruit preserves, these cookies are not only a treat for the taste buds but also a feast for the eyes.
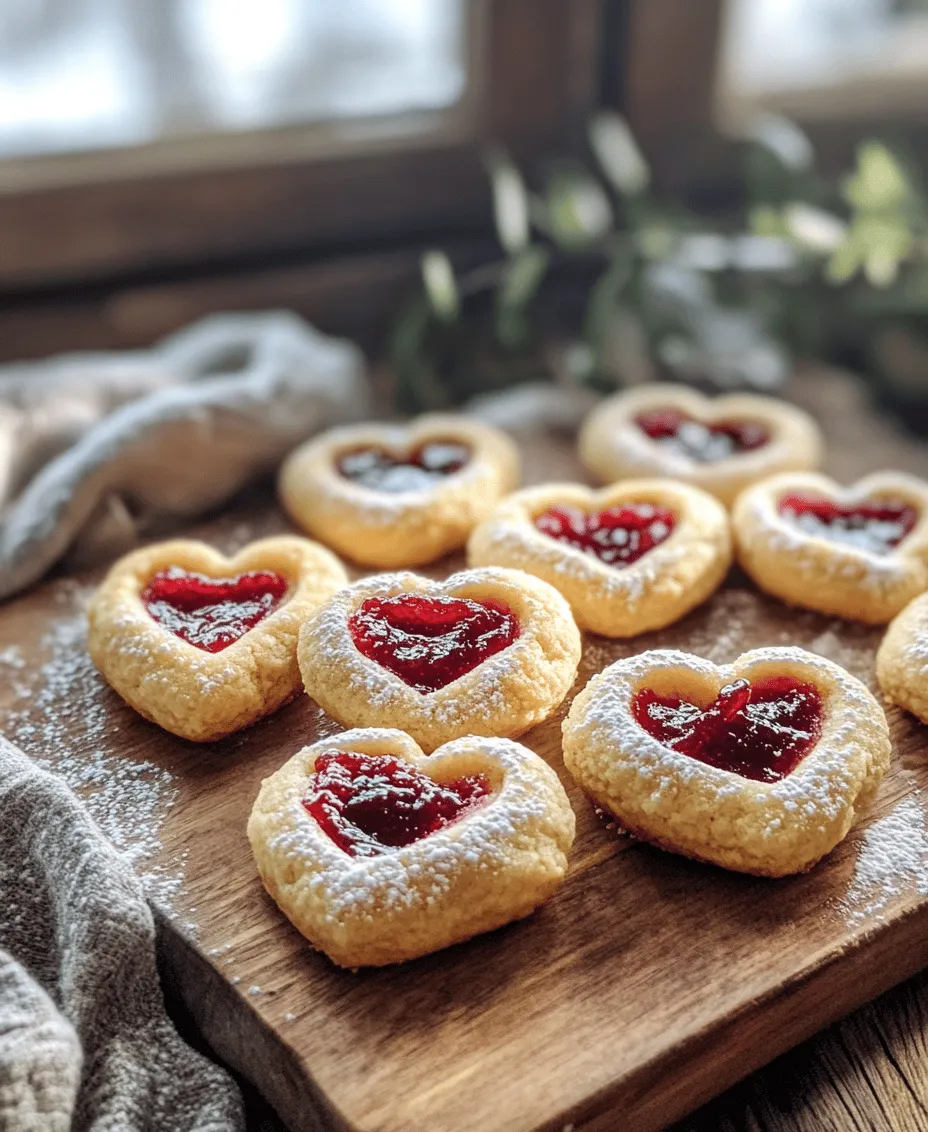
Heart-Shaped Thumbprint Cookies are renowned for their unique shape and delectable flavor. The classic thumbprint design allows for a delightful burst of flavor in every bite, with the sweet jam or fruit preserves nestled in the center. This article will delve into the ingredients, detailed steps, and the joy of baking these cookies, ensuring that you can recreate this classic in your own kitchen. Whether you’re an experienced baker or a novice, you’ll find that this recipe is approachable and rewarding.
Understanding the Heart-Shaped Thumbprint Cookie
The Origin of Thumbprint Cookies
Thumbprint cookies have a rich history that dates back centuries. While the exact origin is somewhat unclear, many historians believe that these delightful cookies can be traced back to Eastern European cuisines. The earliest versions were made with simple ingredients and were often filled with nuts or jams. Their thumbprint design is thought to symbolize the personal touch of the baker, making each cookie unique.
In various cultures, thumbprint cookies have been adapted to reflect local tastes and ingredients. For instance, in Sweden, they are known as “Hallongrottor,” which translates to “raspberry caves,” showcasing the use of raspberry jam as a filling. In Switzerland, these cookies might be filled with chocolate ganache or hazelnut spread, demonstrating the versatility and global appeal of this cookie style.
Over time, thumbprint cookies have evolved, and bakers have started to experiment with different shapes, including the heart shape. Heart-Shaped Thumbprint Cookies capture the essence of affection and care, making them a popular choice for celebrations of love. The traditional thumbprint cookie has transitioned from a simple treat to a symbol of love, joy, and creativity in baking.
The Appeal of Heart-Shaped Cookies
Heart-shaped cookies have a special place in the hearts of many, especially during festive occasions. Their unique shape adds a personal touch, making them perfect for expressing feelings of love and appreciation. Whether it’s Valentine’s Day, anniversaries, or weddings, heart-shaped cookies are often the star of the dessert table, capturing the essence of the occasion.
The appeal of these cookies goes beyond their shape. The combination of buttery cookie dough and a sweet, fruity filling creates a delightful contrast that is hard to resist. These cookies are not just visually appealing; they are packed with flavor that evokes warm memories and shared moments. Baking and sharing heart-shaped cookies can strengthen bonds between friends and family, making them a cherished tradition in many households.
Moreover, heart-shaped cookies are versatile. While this recipe focuses on the classic thumbprint style, bakers can customize them with various fillings, toppings, and decorations to suit any occasion. The possibilities are endless, allowing for creativity and personalization that makes each batch unique.
Ingredients Breakdown
To create these delicious Heart-Shaped Thumbprint Cookies, you will need the following essential ingredients, each playing a crucial role in achieving the perfect flavor and texture.
Essential Ingredients for Thumbprint Cookies
– Unsalted Butter: The foundation of the cookie’s flavor. Using unsalted butter allows you to control the salt levels in your recipe, and it contributes to the rich, creamy texture that makes these cookies melt in your mouth.
– Granulated and Brown Sugar: The balance of sweetness and texture is key to great cookies. Granulated sugar helps create a crisp exterior, while brown sugar adds moisture and a hint of caramel flavor, resulting in a chewy, delicious cookie.
– Egg Yolk: The binding agent that adds richness and moisture to the dough. The egg yolk helps create a tender cookie and enhances the overall flavor profile.
– Vanilla Extract: A staple in cookie recipes, vanilla extract enhances the flavor of the dough, providing a warm and inviting aroma that complements the sweetness of the jam.
– All-Purpose Flour: The structure of the cookie. All-purpose flour provides the necessary gluten to create a stable dough that holds its shape while baking.
– Salt: A small but essential ingredient that elevates the flavors of the other ingredients. It enhances the overall taste and balances the sweetness of the cookies.
– Jam or Fruit Preserves: The sweet filling that makes these cookies special. The choice of jam is crucial; it adds flavor and visual appeal, creating a pop of color in the center of the cookie.
– Optional Powdered Sugar: For an elegant finish. Dusting the cookies with powdered sugar before serving can add a beautiful touch and enhance their presentation.
Choosing the Best Jam or Fruit Preserves
When selecting jam or fruit preserves for your Heart-Shaped Thumbprint Cookies, quality matters. Opt for high-quality, natural fruit preserves that are made with real fruit and minimal additives. Look for options that have a rich flavor and a thick consistency to ensure they hold up well in the cookie center without running over.
Some popular choices for filling include:
– Raspberry Jam: Offers a sweet-tart flavor that pairs perfectly with buttery cookies.
– Strawberry Jam: A classic option that brings a familiar sweetness to the cookies.
– Apricot Preserves: Provides a smooth texture and a unique flavor profile that stands out.
– Cherry Preserves: Adds a bold, fruity flavor that complements the cookie’s richness.
Experimenting with different flavors can also yield delicious results. Consider using lemon curd for a zesty twist or chocolate hazelnut spread for a decadent variation. The key is to choose a filling that you enjoy and that will create a delightful contrast with the cookie base.
Step-by-Step Instructions
Before we dive into the baking process, it’s essential to prepare your kitchen for the adventure ahead. A well-organized workspace can make all the difference in your baking experience.
Prepping Your Kitchen for Baking
Start by gathering all the necessary tools and equipment:
– Mixing bowls: For combining ingredients.
– Measuring cups and spoons: To ensure accurate measurements.
– Baking sheets: Prepare two or three baking sheets lined with parchment paper for easy clean-up.
– A hand mixer or stand mixer: To cream the butter and sugars together.
– A spatula: For scraping down the sides of the mixing bowl.
– A heart-shaped cookie cutter: To shape your cookies.
Once you have everything in place, you can start the fun part—baking!
Preheat the Oven: Setting the Stage for Baking
The first step in baking your Heart-Shaped Thumbprint Cookies is to preheat your oven. Set your oven temperature to 350°F (175°C). Preheating the oven ensures that your cookies bake evenly and achieve the perfect texture. While the oven is warming up, you can begin preparing the cookie dough.
With your ingredients ready and your kitchen prepped, you’re well on your way to creating these delightful cookies. The next steps will guide you through mixing the ingredients and shaping the dough into heart-shaped delights, ready for their sweet filling. Stay tuned as we continue our journey into the world of baking Heart-Shaped Thumbprint Cookies!
Importance of Preheating and How It Affects the Cookie’s Texture
Preheating your oven is a crucial step in baking, particularly when making cookies like heart-shaped thumbprint cookies. By preheating the oven to the specified temperature, you ensure that the cookies start baking immediately when placed inside. This not only helps them rise properly but also promotes an even texture throughout. If you skip this step, the cookies may spread too much or remain undercooked in the center, leading to a less-than-ideal texture. A well-preheated oven allows for the perfect balance of crisp edges and chewy centers, creating the delightful texture that makes thumbprint cookies so irresistible.
Creaming the Butter and Sugars: Creating the Base
The creaming process is essential in creating the perfect base for your cookies. This step involves beating softened butter with granulated and brown sugars until the mixture is light and fluffy. The goal is to incorporate air into the batter, which will help the cookies rise and create a tender crumb.
To achieve the ideal consistency, start with room-temperature butter; it should be soft enough that you can easily press your finger into it but not melted. Use a stand mixer or hand mixer on medium speed to beat the butter and sugars together for about 3 to 5 minutes. You should notice a change in color and texture; the mixture should become pale and fluffy. Scrape down the sides of the bowl periodically to ensure everything is well combined. This step is vital because it sets the foundation for the cookies’ flavor and texture.
Incorporating Egg and Vanilla: Building Flavor
Once your butter and sugar mixture is ready, it’s time to incorporate the wet ingredients: the egg and vanilla extract. Adding these ingredients not only enhances the flavor but also helps to bind the mixture together.
To ensure a smooth incorporation, crack the egg into a separate bowl first to check for any shell fragments. Add the egg and vanilla extract to the creamed butter and sugars, and mix on low speed until just combined. Be careful not to overmix at this stage; overmixing can lead to dense cookies as it develops the gluten in the flour. You want the mixture to be cohesive without any visible streaks of egg.
Combining Dry Ingredients: The Science Behind Baking
The next step is combining your dry ingredients, which typically include all-purpose flour, baking powder, and a pinch of salt. Understanding the role of each component is key to achieving the perfect cookie.
Start by whisking together the flour, baking powder, and salt in a separate bowl. This ensures that the leavening agent is evenly distributed throughout the flour, which is crucial for uniform rising. When it comes time to incorporate the dry ingredients into the wet mixture, do so gradually. Add the flour mixture in three parts, mixing on low speed until just combined after each addition. Avoid over-mixing, as this can lead to tough cookies. The goal is to combine everything until you no longer see any dry flour, resulting in a soft, slightly sticky dough.
Shaping the Cookies: Crafting the Perfect Form
Once your dough is ready, it’s time to shape the cookies. Start by using a cookie scoop or your hands to portion out about one tablespoon of dough for each cookie. Roll the dough into a ball and place it on a parchment-lined baking sheet, leaving sufficient space between each cookie, as they will spread while baking.
To create the iconic thumbprint shape, gently press your thumb into the center of each ball, making a well for the filling. Be careful not to press all the way through; you want a deep enough indentation to hold the jam but not so deep that the cookie breaks apart. This step is essential for creating the heart shape later on, so take your time to ensure an even and consistent shape.
Creating the Heart Shape: A Romantic Touch
To add a romantic flair to your thumbprint cookies, you can transform the simple round shape into hearts. After creating the thumbprint, use your fingers to gently pinch the sides of the cookie dough ball, shaping it into a heart.
This technique requires a bit of patience, as you want to maintain the integrity of the dough while achieving the desired shape. A good tip is to ensure your dough is cool enough; if it feels too soft, refrigerate it for about 15 minutes before shaping. Once shaped, place the cookies back on the baking sheet, ensuring that the heart shape remains intact.
Filling with Jam: The Sweet Surprise
Now comes the fun part—filling your thumbprint cookies with jam! Choose your favorite jam or preserves; raspberry, strawberry, and apricot are popular choices. Use a small spoon to fill each heart-shaped well with jam.
Be cautious not to overfill; about a teaspoon of jam should suffice. If you add too much, the jam may overflow while baking, creating a messy result. The filling should sit just below the edge of the cookie, allowing for a beautiful presentation while ensuring the jam doesn’t spill over during the baking process.
Baking the Cookies: Timing for Perfection
Preheat your oven to 350°F (175°C) if you haven’t already. Once the cookies are filled and shaped, it’s time to bake them. Place the baking sheet in the preheated oven and set a timer for about 10-12 minutes, keeping a close eye on them as baking times can vary depending on your oven and the size of your cookies.
You’ll know the cookies are ready when the edges turn a light golden brown, while the centers should still look slightly soft. This ensures that they will have a chewy texture once cooled. Remove the cookies from the oven and let them sit on the baking sheet for about 5 minutes before transferring them to a wire rack to cool completely.
Cooling and Dusting: The Final Touch
Proper cooling is essential to achieving the perfect texture. Allow the cookies to cool completely on a wire rack, as this helps them firm up and prevents them from becoming soggy.
Once cooled, you can dust the cookies with powdered sugar for an elegant finish. Use a fine mesh sieve for even distribution; this simple step enhances their visual appeal, making them perfect for gifting or serving at special occasions.
Serving Suggestions
Aesthetic Presentation Ideas
When it comes to presenting your heart-shaped thumbprint cookies, creativity can elevate the experience. Arrange the cookies on a decorative platter or cake stand, perhaps adding some fresh berries or edible flowers for a pop of color. You can also place them in a decorative tin or box tied with a ribbon for a charming gift. For a romantic touch, consider serving them alongside a vase of flowers or in a picnic setting with a lovely blanket.
Pairing Suggestions
These cookies pair wonderfully with a variety of beverages or desserts. For a classic combination, serve them with a cup of freshly brewed coffee or tea, allowing the flavors to complement each other beautifully. If you’re feeling indulgent, consider pairing them with a scoop of vanilla or raspberry ice cream for a delightful dessert experience. A glass of sparkling lemonade or a sweet dessert wine can also enhance the overall enjoyment of these cookies.
Conclusion
Heart-shaped thumbprint cookies are a delightful addition to any baking repertoire, offering both flavor and visual appeal. With simple ingredients and straightforward steps, this recipe is perfect for bakers of all skill levels. Whether you’re celebrating a special occasion or simply indulging in a sweet treat, these cookies are sure to bring joy to your table. Enjoy the process of baking and sharing these delightful creations with loved ones, as every bite is a reminder of the sweetness in life. With their charming shape and delicious jam filling, your heart-shaped thumbprint cookies will undoubtedly become a cherished favorite for years to come.