
Introduction
In the world of desserts, trends come and go, but some combinations never fail to capture our hearts and taste buds. Cheesecake and banana pudding are two beloved classics that evoke nostalgia and satisfaction. Cheesecake, with its rich creaminess, and banana pudding, with its light, fluffy texture, are staples at potlucks, family gatherings, and summer picnics. What if you could combine these two favorites into one fun, portable treat? Enter the Banana Pudding Cheesecake Cones—a unique fusion dessert that encapsulates the best of both worlds.
This innovative dessert trend is taking the culinary scene by storm, and for good reason. The Banana Pudding Cheesecake Cones are not only easy to make, but they also boast a visually appealing presentation that makes them perfect for impressing guests at parties or simply indulging in at home. With layers of creamy cheesecake filling, sweet bananas, and a crunchy cookie base all elegantly served in a cone, these treats are sure to be a hit among dessert lovers, party hosts, and anyone looking for a creative sweet fix.
The Allure of Banana Pudding and Cheesecake
Banana pudding is a quintessential American dessert that brings comfort and joy to many. Traditionally made with layers of vanilla pudding, sliced bananas, and whipped cream, this dessert has been a staple in Southern kitchens for generations. Its creamy texture and delightful flavor profile make it a favorite for many, evoking memories of family gatherings and summer barbecues.
On the other hand, cheesecake is a dessert that has won the hearts of many dessert connoisseurs worldwide. Its rich, velvety texture and balanced sweetness can elevate any dining experience. Cheesecake can be made in various flavors and styles, but the classic New York-style cheesecake remains a crowd-pleaser, known for its dense texture and creamy filling.
Combining banana pudding and cheesecake results in a harmonious blend of flavors and textures. The smooth, rich cheesecake filling complements the soft, sweet bananas, while the crunchy vanilla wafer cookie base adds a delightful contrast. Together, they create a dessert that is not only delicious but also visually striking when served in a cone.
Ingredients Overview
To create these Banana Pudding Cheesecake Cones, you’ll need a handful of key ingredients, each playing a vital role in achieving the perfect flavor and texture. Here’s a detailed breakdown of what you’ll need:
– Vanilla Wafer Cookies: These cookies are essential for creating a sturdy cone base. Their sweet, buttery flavor complements the cheesecake and banana filling beautifully. You’ll crush them to form a crumb mixture that will provide both flavor and texture.
– Cream Cheese: The star ingredient for the cheesecake filling, cream cheese brings the rich, creamy element that cheesecake lovers adore. Ensure that it is at room temperature for easy mixing and a smooth texture.
– Heavy Cream: This ingredient is crucial for achieving that luxurious creaminess in the cheesecake filling. Whipping the heavy cream adds airiness and lightness, balancing the density of the cream cheese.
– Ripe Bananas: Fresh bananas add natural sweetness and a soft texture to the mixture. Using ripe bananas ensures maximum flavor and sweetness, making each bite deliciously satisfying.
– Instant Pudding Mix: This ingredient adds flavor and helps thicken the cheesecake filling, ensuring it holds its shape beautifully. Opt for vanilla or banana-flavored pudding mix for an added depth of flavor.
Tips for Selecting the Best Ingredients for Optimal Flavor
When preparing your Banana Pudding Cheesecake Cones, the quality of your ingredients matters. Choose fresh, ripe bananas with a few freckles for the best sweetness. For cream cheese, opt for a full-fat version for a richer taste, and let it soften at room temperature before using it to avoid lumps. When picking your vanilla wafer cookies, look for brands that have a good crunch and flavor, as they will form the base of your dessert.
Preparation Steps Explained
Creating the Cone Base
A sturdy cone base is essential for the structural integrity of your Banana Pudding Cheesecake Cones. Here’s how to create the perfect base:
1. Crush the Vanilla Wafer Cookies: Start by placing the vanilla wafer cookies in a food processor or a zip-top bag. Crush them into fine crumbs, ensuring there are no large chunks that could compromise the texture. The crushed cookies will act as the foundation of your cones, providing stability and crunch.
2. Combine with Melted Butter: In a mixing bowl, combine the crushed cookies with melted butter. The butter acts as a binding agent, helping the crumbs hold their shape when packed. Stir until the mixture resembles damp sand and can hold together when pressed.
3. Shape the Cone Base: To form the cones, you can use cone-shaped molds or even paper cones if you don’t have specialized equipment. Press the cookie mixture firmly into the base of the cone, making sure to evenly distribute it along the sides. This ensures that each bite has the same delightful crunch.
4. Chill the Cone Base: Once shaped, place the cones in the refrigerator for about 15-20 minutes to set. Chilling allows the butter to firm up, making the cones easier to handle when it comes time to fill them.
By following these initial steps, you’ll create a solid foundation for your Banana Pudding Cheesecake Cones, setting the stage for the delicious filling that will come next. As you prepare to layer the creamy cheesecake filling and fresh bananas, you’ll be well on your way to impressing your family and friends with this delightful treat.
Stay tuned for the next section, where we will dive into the process of making the cheesecake filling and assembling the cones for a visually stunning and tasty dessert that everyone will love!
Making the Cheesecake Filling
The key to a luscious Banana Pudding Cheesecake Cone lies in the cheesecake filling. Start by combining cream cheese, sugar, vanilla extract, and a pinch of salt in a large mixing bowl. Beat the mixture using an electric mixer on medium speed until smooth and creamy, which should take about 2-3 minutes.
To achieve that perfectly smooth and creamy texture, it’s crucial to ensure that your cream cheese is at room temperature. This eliminates lumps and results in a velvety filling. If you’re short on time, you can microwave the cream cheese in 10-second intervals until softened, but be careful not to melt it.
Next, you’ll want to fold in the whipped cream. This step is vital for maintaining that light and airy consistency that makes cheesecake so delightful. Use a spatula to gently fold the whipped cream into the cream cheese mixture, being careful not to deflate it. Start by adding a small amount of whipped cream to the cream cheese mixture to lighten it, then gently fold in the remaining whipped cream in a few additions. The goal here is to combine the ingredients while preserving the airiness of the whipped cream, which contributes to the overall texture of the cheesecake filling.
Preparing the Banana Pudding
For the banana pudding component, you’ll want to create a thick and creamy pudding that complements the cheesecake filling. Start by whisking together instant banana pudding mix with milk according to the package instructions. The beauty of using instant pudding is its simplicity and convenience—there’s no need for cooking or extensive preparation.
As you mix the pudding, add a teaspoon of lemon juice. This small addition enhances the flavor profile by adding a subtle zing that balances the sweetness of the pudding. It also helps in keeping the bananas from browning when layered in the cones. Once combined, let the pudding sit for about 5 minutes until it thickens to your desired consistency.
Layering the Ingredients
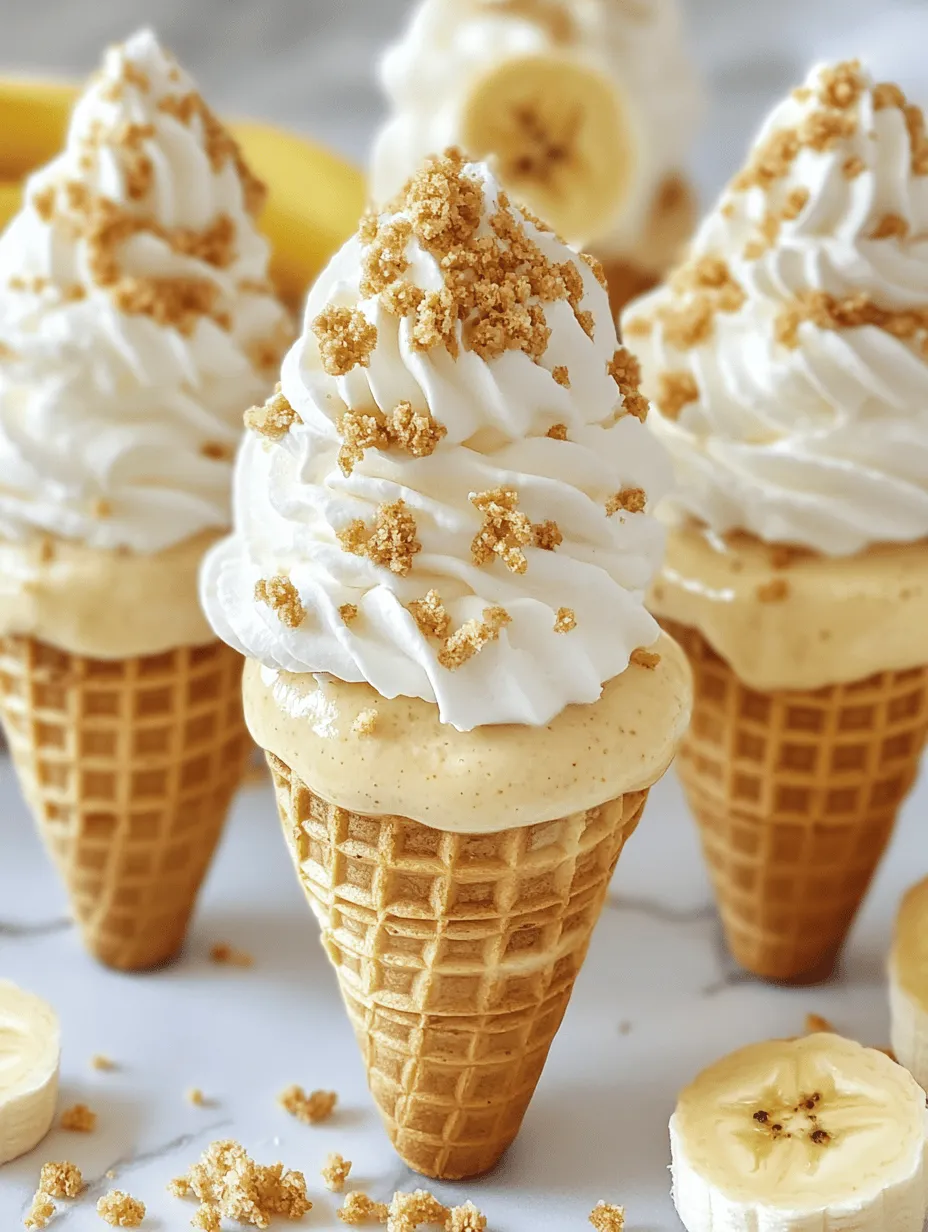
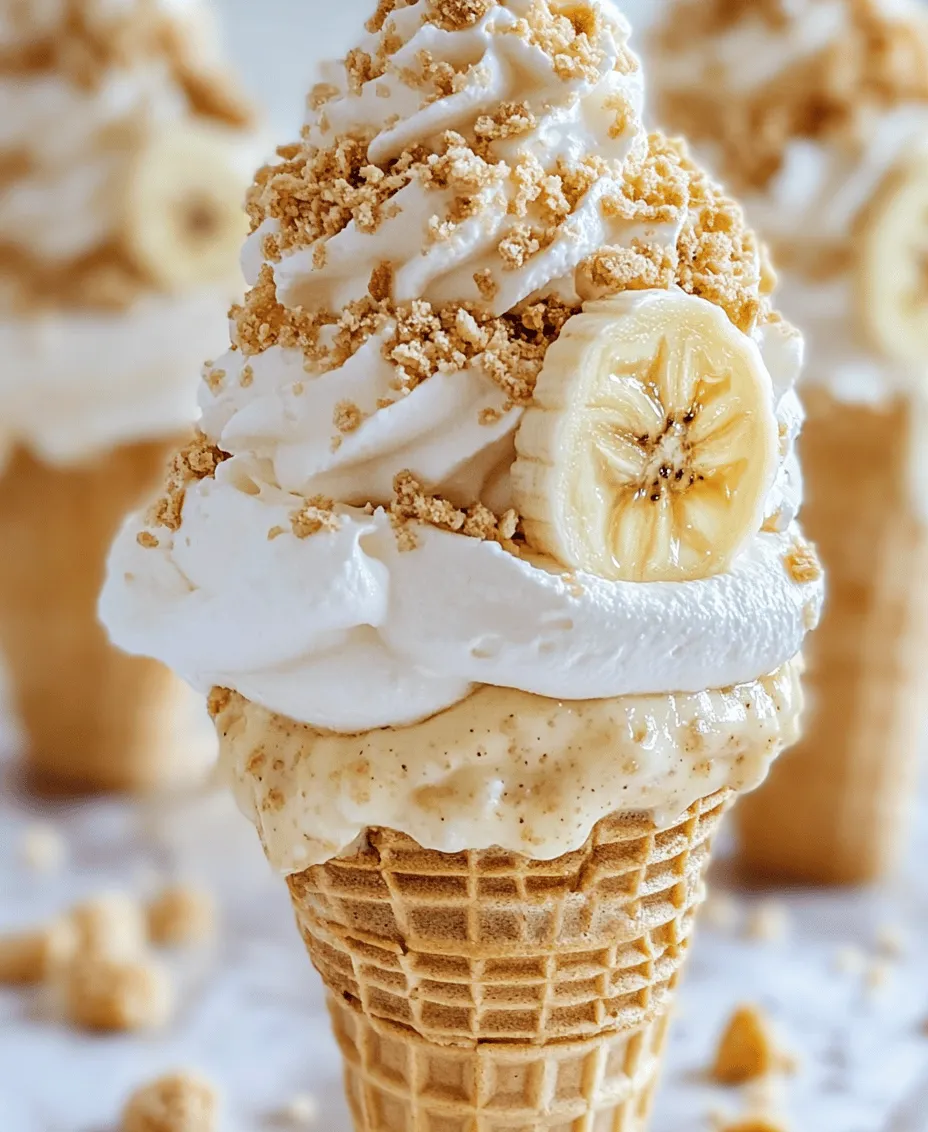
Layering is where the magic happens in your Banana Pudding Cheesecake Cones. Start by spooning a layer of the cheesecake filling into the bottom of a cone, followed by a layer of banana pudding. The key to creating visually appealing layers is to use a piping bag fitted with a large round tip or a zip-top bag with the corner snipped off. This method allows for precise placement and creates a beautiful layered effect.
After adding the banana pudding, sprinkle some sliced bananas and crushed vanilla wafers on top before repeating the layers. Continue alternating between the cheesecake filling and banana pudding, ensuring each layer is distinct. Not only does this layering create a stunning visual display, but it also balances flavors with every bite—sweet, creamy cheesecake, rich banana pudding, and crunchy wafers.
Topping and Garnishing
Presentation plays a significant role in dessert appeal. After layering your cones, it’s time to think about toppings. While crushed vanilla wafers are a classic choice, consider adding a dollop of whipped cream on top for extra indulgence. You can also drizzle caramel sauce or chocolate syrup for a decadent touch.
For a pop of color and freshness, consider garnishing with fresh banana slices or a sprinkle of toasted coconut. Even a dusting of cocoa powder can add a sophisticated flair. The goal is to create an eye-catching dessert that invites your guests to dig in!
Chilling and Serving the Cones
Once your cones are assembled and beautifully garnished, it’s time for the chilling process. Place them in the refrigerator for at least 2 hours before serving. This chilling time allows the flavors to meld together, creating a more cohesive taste experience. It also firms up the pudding and cheesecake filling, making them easier to enjoy without making a mess.
These Banana Pudding Cheesecake Cones are perfect for a variety of occasions. Whether you’re hosting a summer barbecue, throwing a birthday party, or simply enjoying a casual dessert night with family, these cones are sure to impress. For an added touch of elegance, consider serving the cones in decorative cups or on a tiered stand. This not only elevates the dessert experience but also makes it easy for guests to grab a cone while mingling.
Nutritional Insights
While Banana Pudding Cheesecake Cones are undeniably a treat, it’s essential to consider their nutritional aspects. The primary ingredients—cream cheese, pudding mix, and bananas—contribute to the overall nutritional profile. Cream cheese provides calcium and protein, while bananas offer potassium and fiber.
However, like many desserts, moderation is key. This recipe can fit into a balanced diet when enjoyed in reasonable portions. Consider pairing these cones with fresh fruit or a light meal to balance out the indulgence. You can also explore alternative ingredients, such as low-fat cream cheese or sugar-free pudding mix, to create a lighter version without sacrificing flavor.
Conclusion
In summary, Banana Pudding Cheesecake Cones are a delightful fusion of creamy cheesecake, rich banana pudding, and crunchy wafers, all wrapped up in a fun and portable cone. This recipe not only showcases the joy of creating a delicious dessert but also provides an opportunity to bond with loved ones over homemade treats.
The process of layering, garnishing, and serving these cones allows for creativity and personalization, making them a fantastic choice for any occasion. So why not give this fun and tasty dessert a try? Your friends and family will be grateful for the sweet surprise, and you’ll bask in the joy of sharing something homemade. Remember, the love and effort put into creating these cones will shine through in every delicious bite. Enjoy the process, and happy baking!