
Introduction
Butterscotch pudding is the epitome of comfort food, evoking nostalgia with its smooth texture and deep, rich flavor. This delightful dessert is a testament to the magic that happens when simple ingredients come together to create something extraordinary. Whether you’re looking to impress guests at a dinner party, celebrate a special occasion, or simply treat yourself after a long day, homemade butterscotch pudding is a fabulous choice. Not only does it provide a sweet reprieve from the hustle and bustle of daily life, but it also brings a sense of joy that only a truly decadent dessert can offer.
The appeal of this recipe lies in its simplicity and versatility. You can serve it in elegant ramekins for a sophisticated touch or in casual bowls for a cozy night in. Topped with whipped cream, a sprinkle of cinnamon, or even a drizzle of chocolate sauce, the possibilities are endless. Join me as we delve into the world of butterscotch pudding, exploring its rich history and the essential ingredients that create this indulgent treat.
Understanding Butterscotch: A Sweet History
Butterscotch is more than just a sweet flavor; it’s a beloved ingredient that has found its way into various desserts, candies, and confections. Traditionally, butterscotch is made by combining brown sugar and butter, which creates a distinctively rich and toasty flavor profile. This combination is often complemented with cream or milk, resulting in a smooth texture that is perfect for puddings, sauces, and even candies.
The origins of butterscotch date back to the 19th century in England, where it was first documented in the early 1800s. It is believed that the name “butterscotch” comes from the practice of “scotching” the sugar syrup, a method of marking the candy before it cooled. Over the years, butterscotch has evolved, finding its way into various cultural dishes around the world. In the United States, butterscotch pudding became particularly popular in the mid-20th century, often served in homes as a comforting dessert.
Culturally, butterscotch holds a special place in many households, often associated with family gatherings, celebrations, and home-cooked meals. Its ability to evoke warmth and nostalgia makes it a cherished treat that transcends generations.
Ingredients Breakdown
To craft the perfect butterscotch pudding, understanding each ingredient’s role is essential. Below is a detailed breakdown of the key components that contribute to the pudding’s rich flavor and creamy texture.
Brown Sugar: The Key to Rich Flavor
Brown sugar is the star of butterscotch pudding. Its molasses content not only gives the pudding its characteristic color but also adds a depth of flavor that granulated sugar simply cannot replicate. The caramel notes of brown sugar are what set butterscotch apart from other desserts, making it a crucial ingredient for achieving that decadent taste.
Cornstarch: Its Role as a Thickening Agent
Cornstarch is a vital ingredient in creating the pudding’s smooth and creamy texture. When heated, cornstarch granules absorb liquid and swell, thickening the mixture. This process is essential for achieving the perfect consistency in butterscotch pudding, ensuring that it is neither too runny nor too stiff.
Whole Milk: Importance of Using Whole Milk for Creaminess
Using whole milk is key to achieving a rich and creamy pudding. The higher fat content in whole milk contributes to a velvety texture that makes each spoonful delightful. While you may be tempted to use low-fat or skim milk, the luxurious mouthfeel of whole milk is irreplaceable in this recipe.
Egg Yolks: Their Contribution to Texture and Richness
Egg yolks play a crucial role in butterscotch pudding by adding richness and a custard-like texture. When combined with the other ingredients and gently heated, the yolks thicken the pudding, creating a luxurious feel. They also provide a beautiful golden hue that enhances the visual appeal of the dessert.
Unsalted Butter: Why Unsalted Butter is Preferred
Unsalted butter is recommended for this recipe to give you control over the saltiness of the pudding. Salted butter can introduce an unpredictable element to your dessert, overshadowing the sweet flavors of the butterscotch. By using unsalted butter, you can ensure that the flavors remain balanced and harmonious.
Vanilla Extract: Enhancing the Flavor Profile
Vanilla extract is a classic addition to many desserts, including butterscotch pudding. It serves to enhance the overall flavor profile, adding warmth and complexity. Opting for pure vanilla extract will give your pudding a more pronounced and natural flavor, elevating the dessert to new heights.
Optional Cinnamon and Garnishes: Adding Personal Touches and Flavor Variations
To take your butterscotch pudding to the next level, consider adding a sprinkle of cinnamon or nutmeg for a warm, spiced flavor. You can also play with garnishes like whipped cream, toasted nuts, or chocolate shavings for added texture and visual appeal. These optional ingredients allow you to personalize your dessert and make it uniquely yours.
Step-by-Step Instructions
Now that we’ve explored the rich history and essential ingredients of butterscotch pudding, let’s dive into the step-by-step instructions for preparing this delightful dessert. Follow these comprehensive guidelines to ensure a perfect result every time.
Step 1: Gather Your Ingredients
Before you begin, make sure you have all your ingredients ready. You will need:
– 1 cup of brown sugar
– 1/4 cup of cornstarch
– 1/4 teaspoon of salt
– 2 3/4 cups of whole milk
– 4 egg yolks
– 4 tablespoons of unsalted butter
– 2 teaspoons of pure vanilla extract
– Optional: 1/2 teaspoon of ground cinnamon for added flavor
Step 2: Combine Dry Ingredients
In a medium saucepan, whisk together the brown sugar, cornstarch, and salt. Mixing these dry ingredients first ensures that the cornstarch is evenly distributed, preventing clumps in your pudding.
Step 3: Mix in Milk
Gradually whisk in the whole milk to the dry mixture, ensuring there are no lumps. Place the saucepan over medium heat and cook, stirring continuously, until the mixture begins to thicken and bubble. This process may take about 5-7 minutes, so be patient and keep stirring to prevent the pudding from sticking to the bottom of the pan.
Step 4: Temper the Egg Yolks
While the pudding mixture is heating, prepare the egg yolks. In a separate bowl, whisk the yolks until they are smooth. Once the milk mixture has thickened, take a small amount of the hot mixture and slowly whisk it into the egg yolks. This process, known as tempering, will gradually raise the temperature of the yolks without cooking them.
Step 5: Combine and Cook
Once the yolks are tempered, return the mixture to the saucepan and continue to cook on medium heat, stirring constantly. Cook for an additional 2-3 minutes until the pudding is thick enough to coat the back of a spoon. Make sure to keep the heat consistent and avoid boiling, as this can curdle the eggs.
Step 6: Add Butter and Vanilla
Remove the saucepan from heat and stir in the unsalted butter and vanilla extract. The butter will melt into the warm pudding, adding richness and a silky texture. Stir until fully incorporated.
Step 7: Chill the Pudding
Pour the butterscotch pudding into individual serving dishes or a large bowl. To prevent a skin from forming on the surface, cover the pudding with plastic wrap, ensuring it touches the surface. Refrigerate for at least an hour to allow the pudding to set.
By following these steps, you’ll create a bowl of decadent butterscotch pudding that is sure to impress anyone who takes a bite. With its rich flavor and creamy texture, this dessert is a delightful addition to any meal or gathering, and its homemade quality makes it all the more special.
Stay tuned for the next part of this article, where we will explore tips for achieving the best results, common questions about butterscotch pudding, and more ways to enjoy this delicious treat!
Preparing the Base: Mixing Dry Ingredients
To create a rich and decadent butterscotch pudding, the first step involves carefully preparing the dry ingredients. In a medium-sized bowl, combine 1/2 cup of granulated sugar, 1/4 cup of packed brown sugar, 1/4 cup of cornstarch, and a pinch of salt. The combination of granulated and brown sugars not only provides sweetness but also contributes to the complex flavor profile of the pudding. The cornstarch is crucial as it acts as a thickening agent, ensuring your pudding reaches that creamy, luscious consistency we all crave.
Using a whisk, thoroughly mix the dry ingredients until they are well combined and free of any lumps. This step is essential as it ensures an even distribution of flavors and helps prevent any clumps in your final pudding. Once mixed, set aside the dry mixture and prepare to combine it with the wet ingredients.
Combining Milk and Dry Ingredients: Achieving a Smooth Mixture
Next, it’s time to introduce the milk. In a saucepan, pour in 2 cups of whole milk and then gradually add the dry mixture you prepared earlier. To achieve a smooth mixture, it’s important to whisk continuously as you pour in the dry ingredients. This technique helps to prevent any lumps from forming, leading to a silky pudding texture.
Once all the dry ingredients have been incorporated into the milk, place the saucepan over medium heat. Keep whisking the mixture consistently as it heats up. This step is crucial because it begins the thickening process. As the mixture heats, the cornstarch will activate, and you’ll start to notice the pudding thickening. Be patient and continue whisking until the mixture reaches a gentle simmer.
Whisking Egg Yolks: Importance of Tempering
While your pudding base is heating, it’s time to prepare the egg yolks. In a separate bowl, crack and separate 3 large egg yolks. Whisk them until they become slightly frothy. The key to achieving a rich and creamy pudding is tempering the egg yolks. Tempering involves gradually introducing the hot mixture to the yolks to prevent them from cooking too quickly and scrambling.
To temper the yolks, take a small amount of the hot pudding mixture and slowly drizzle it into the bowl of whisked yolks while continuously whisking. Repeat this process a few times until the yolks are warmed up. Then, pour the tempered yolk mixture back into the saucepan with the remaining pudding base. This method ensures that the egg yolks blend seamlessly into the pudding without curdling.
Cooking Process: Consistency and Texture Tips
Return the saucepan to the heat and continue to cook the pudding over medium heat, stirring constantly. As you do this, keep a close eye on the consistency. You want to cook the mixture just until it thickens to a custard-like consistency. This typically takes about 5 to 7 minutes. Be careful not to overheat the pudding, as this can lead to a grainy texture.
To check if the pudding is thick enough, dip a spoon into the mixture. If it coats the back of the spoon and leaves a clear line when you run your finger through it, you know it’s ready. Once the desired thickness is achieved, remove the saucepan from the heat.
Final Mixing: Incorporating Butter and Vanilla for Flavor
Now comes the final touch that elevates your butterscotch pudding to new heights: adding butter and vanilla. Stir in 2 tablespoons of unsalted butter and 1 teaspoon of pure vanilla extract. The butter enriches the pudding, adding a luxurious mouthfeel, while the vanilla enhances the overall flavor profile. Stir until the butter is fully melted and incorporated into the pudding.
At this point, you may notice that your pudding has a beautiful golden color and an irresistible aroma. To ensure a smooth finish, you can strain the pudding through a fine-mesh sieve into a clean bowl. This step is optional, but it helps to remove any potential lumps and create an ultra-smooth texture.
Cooling and Serving: Best Practices for Presentation
After mixing in the butter and vanilla, it’s time to let your pudding cool. Pour the pudding into individual serving dishes or a large bowl, depending on your preference. To prevent a skin from forming on the surface, cover the pudding with plastic wrap, pressing it directly onto the surface of the pudding.
Let the pudding cool at room temperature for about 30 minutes, then transfer it to the refrigerator to chill for at least 2 hours. This chilling time allows the flavors to meld together and the pudding to set properly.
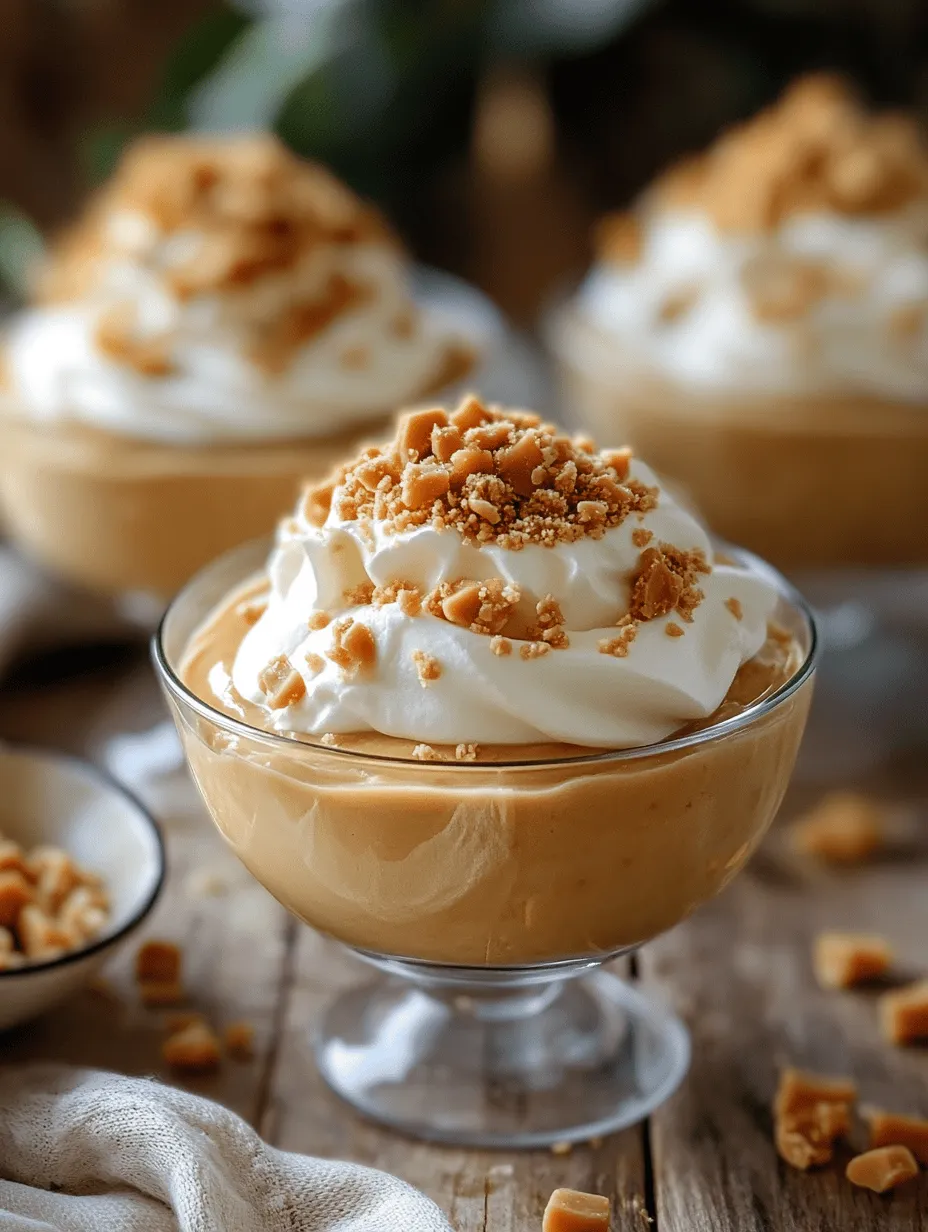
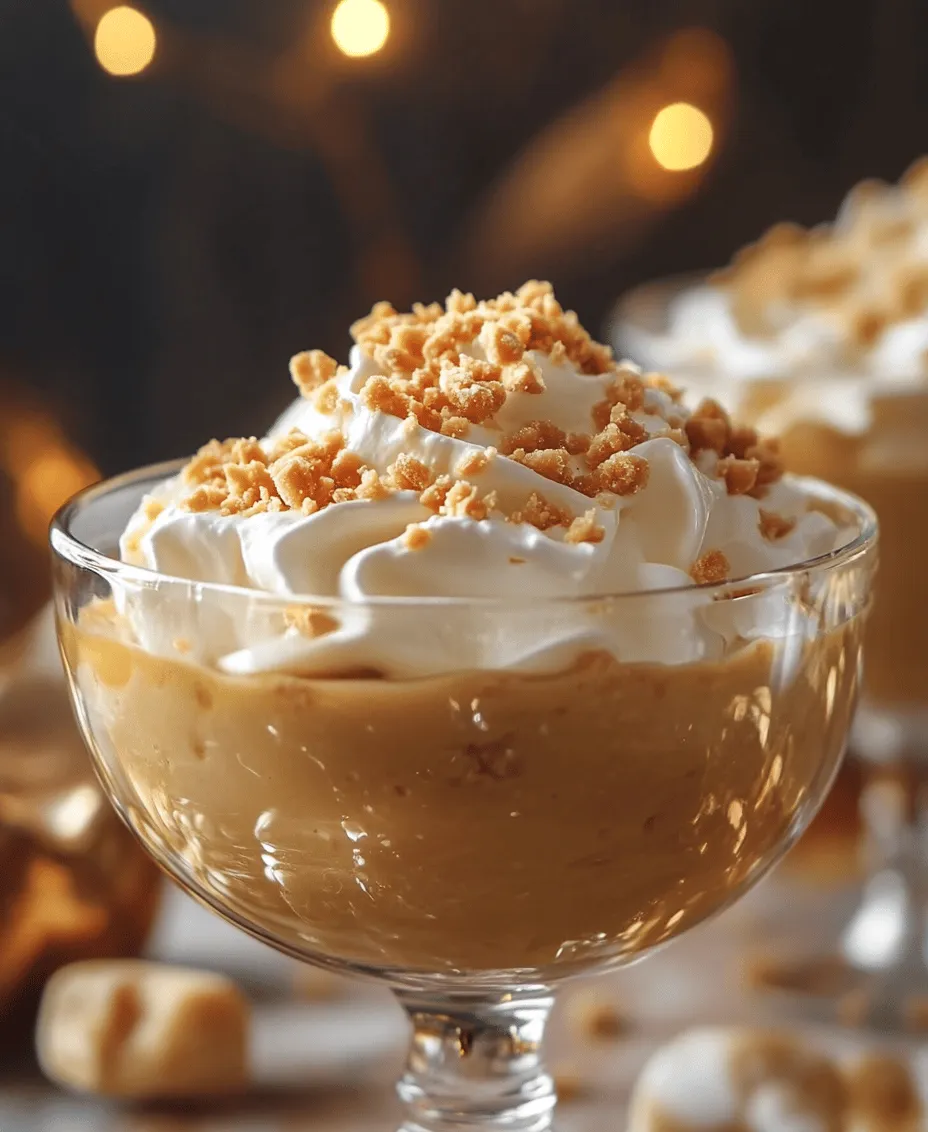
When you are ready to serve, give the pudding a gentle stir to ensure a smooth consistency. You can top your butterscotch pudding with whipped cream, crumbled cookies, or shaved chocolate to add visual appeal and extra flavor.
Tips for Perfect Pudding
To achieve the perfect butterscotch pudding, keep these tips in mind:
– Common Mistakes to Avoid: One of the most common mistakes is overheating the mixture. Always cook over medium heat and stir constantly to prevent burning. Additionally, ensure that the dry ingredients are fully mixed before adding them to the milk to avoid lumps.
– How to Achieve the Perfect Texture: The key to a creamy pudding lies in the cooking process. Stir continuously and monitor the heat to reach the ideal thickness without curdling the eggs.
– Suggestions for Customizing the Recipe: Experiment with flavors by adding a pinch of sea salt for a salted butterscotch pudding or incorporating spices like cinnamon or nutmeg. For dietary modifications, you can substitute almond or coconut milk for a dairy-free version, or use a sugar substitute for a lower-calorie option.
Serving Suggestions
The versatility of butterscotch pudding makes it an excellent dessert choice for any occasion. Here are some ideas for serving:
– Ideal Pairings for Butterscotch Pudding: Pair your pudding with classic accompaniments like fresh berries, sliced bananas, or a sprinkle of chopped nuts for added texture and flavor.
– Presentation Ideas for Gatherings and Special Occasions: Consider serving the pudding in elegant glass cups or jars for a beautiful presentation. Top it with whipped cream and a drizzle of butterscotch sauce for an impressive touch.
– Creative Ways to Incorporate Butterscotch Pudding into Other Desserts: Elevate your dessert game by layering butterscotch pudding in parfaits with crushed cookies and whipped cream, or use it as a filling between layers of cake for a delightful trifle.
Storing and Reheating Butterscotch Pudding
If you happen to have leftover butterscotch pudding, proper storage is key to maintaining its flavor and texture.
– Best Practices for Storing Leftovers: Store any remaining pudding in an airtight container in the refrigerator. It’s best consumed within 3 to 5 days for optimal freshness.
– How to Maintain Flavor and Texture When Reheating: If you prefer warm pudding, reheat it gently on the stovetop over low heat, stirring often to avoid scorching. You may need to add a splash of milk to restore creaminess.
Conclusion
Butterscotch pudding is more than just a dessert; it’s a nostalgic treat that brings warmth and comfort to any table. Whether you’re making it for a family gathering, a special occasion, or simply to indulge your sweet tooth, this homemade pudding is sure to delight.
We encourage you to try this recipe and experience the joy of creating a rich, creamy butterscotch pudding from scratch. Each spoonful is a reminder of the simple pleasures of homemade desserts, evoking fond memories and creating new ones. Dive into this sweet experience, and savor the delightful taste of your culinary creation.